Log Necklace with Woodland Creatures part1

Cheryl the Owl
Cheryl the Owl
A good log always has a habitat for someone to live in. Meet Cheryl the owl. She is your very own emotional support creature. She likes to snuggle in her log at all times and accompany you wherever you go! She’ll listen to all your complaints and venting but never will judge you. And you can trust her to keep the secret for sure. So make one of your own and spill your guts! Aren’t you feeling better already?
The Creatalong Wood texture inspired me to make this faux log. This tutorial will let you use all those scrap clay that’s laying around on your table that you didn’t know what to do as well as challenge you to a bit of sculpting. The creature shown is an owl, but any one can live inside your log. What would you like to have in your log?
Check out the slide show below followed by detailed instructions

Tools & Supplies
Featured Tool - Texture Sheet wood planks for polymer clay and mixed media stamping
Get it here http://bit.ly/2P3BspA
Get 5% off with coupon code ELISSA http://bit.ly/2mCXeWJ
Polymer Clay
For the log core - equal amount of White and Translucent, a bit of Beige
Bark - any scrap clay of preferably in earthy tones, browns, grays, blacks and a few colors here and there.
Any color for your creature
Tools and materials
Powder - for the inside of the hole.
Createalong has a good pack to start.
Pigments Mineral Palette Powders Metal Oxides Patina set of 5 http://bit.ly/2XXGc40About 2” of wire 22 gague.
1 Eye pin
Liquid clay
Wax Paper
Acrylic Paint for antiquing Black or Dark brown.
Tile or glass sheet or flat surface of your choice
Pasta machine
Acrylic rod
Tissue Blade
Needle tool
Sculpture Tools
Something sharp and a ball tool would be good.
Createalong has some tools http://bit.ly/2P0tBbY
Directions
Core of the log cane

Step 1
Condition White and Translucent clay together. Divide into 2 equal parts.
Take one of the white translucent mixture and add a bit of Beige and mix well.
Run white clay through the pasta machine at middle settings.(Around 4 or 5) to form a sheet.
Repeat with Beige

Step 2
Lay the 2 shades on a tile and cut the edges to make it straight.
Take the beige clay from cut off edge remnant from step 4 into a skinny snake about the same width as the 2 sheets. Snake log should be around ⅛” in thickness.

Step 3
Place the beige snake on the edge of the white sheet and roll it once like a sushi roll. Cut off the sheet to form a circle around the snake. Make sure there’s no air bubbles.
Smooth out the seam with your finger lightly. It does not have to be perfect.
Take this log and roll it on a Beige sheet.
Repeat the process alternating colors until all the sheet clay is used up or desired diameter has been reached. About ¾” Log cane can be a bit on the thicker side because it can always be reduced to your desired thickness at a later time.
See photo below for the pattern we are looking for.
Set aside.

Bark Sheet

Step 1
Roll various scrap clay into skinny snakes.
Bunch them up randomly and form a rod.
Roll it out using the acrylic rod to a flatter slob.

Once it’s skinny enough for the pasta machine run it rough a few times at the 2nd thickest setting until there’s a nice marble or striped pattern. Be careful not to mix too much. You want this random chaos on your bark. Embrace your OCD and let it go wild!

Step 2
Place the sheet on a waxed paper. I find it easier to do the next step on a wax paper but it’s optional.
Place the Texture Sheet “wood planks for polymer clay and mixed media stamping” on top of the clay and press hard. You might want to use your acrylic rod to make the impression deep. * Don’t worry too much about the pattern being exact. Since it’s a marbled clay, design is not so visible. Also what we want is the texture from the stamps. it’s doubled that some impressions are smudged or doubled.
Set aside

Assemble the Log

Step 1
Take the Core Cane and reduce to your desired diameter
Cut about 1 ½” or 2” long. This will be your log core.

Step 2
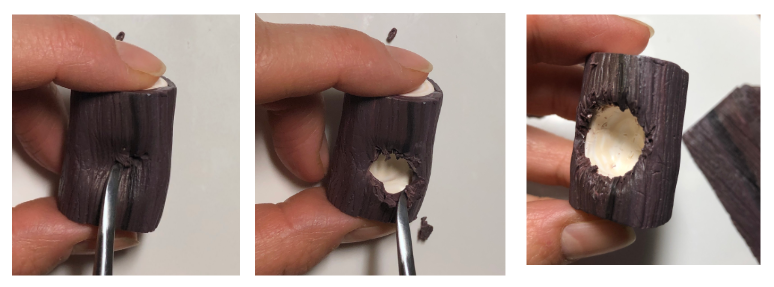
Take a sculpture tool and gouge out a chunk from the log to form a hole for your creature to live in. After a chuck is taking out, use a ball tool to smooth it out.
Shape your log back to a log if any indentation was made during the gouging.

Step 3
Lay out the Bark sheet Textured side down cut the edge along the grain lines to smooth.

Step 4
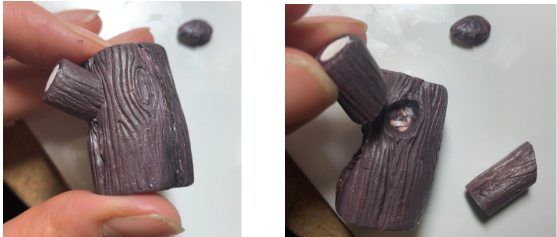
Place the log cane to the edge of the bark sheet
Roll it like sushi. The same way the log cane was formed.

Step 5
Smooth out the joints using the sculpture tools, adding lines to blend the seem.
Step 6
Using your finger tip to look for the gouge hole
Take your sculpting tool to break open the bark around the hole leaving the edges rough and jaggedy. Be gentle and try not to disrupt the impression pattern on the surface of the bark.
*Optional step *
make a mini version of the log and attach it to the side to create a branch. Indent a section to insert the branch.
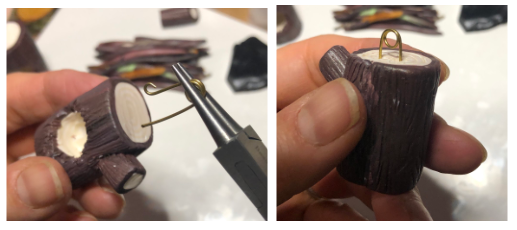
Step 7
Add a hook to the log for hanging. I take a wire and make a loop with edges sticking out. Make one of the edge with a hook so it won’t slip out of the clay after baking.